
Good lighting above a kitchen island transforms the space from purely functional to genuinely livable. It’s one of those upgrades that pays dividends every day, whether you’re prepping dinner, doing assignments, or just hanging out. Unlike a ceiling fixture that floods the whole room, island lights create a focal point, define the workspace, and set the mood. This guide walks you through choosing the right fixture, sizing it correctly, and getting it installed without hiring an electrician (unless the wiring demands it). We’ll cover styles, materials, height placement, and budget-savvy options so your island becomes as beautiful as it is practical.
Table of Contents
ToggleKey Takeaways
- A kitchen island light fixture should hang 30–36 inches above the countertop to prevent head bumps and glare while properly illuminating your workspace.
- Island lighting count depends on size: use one fixture for islands under 4 feet, two for 4–6 feet, and three for islands 6–8 feet or longer.
- Pendant lights remain the most popular kitchen island light fixture choice, though chandeliers, flush-mounts, and track lighting each offer distinct advantages depending on ceiling height and style.
- Choose fixture materials that match existing hardware like faucets and cabinet pulls, with stainless steel and brass being durable options that complement modern and transitional kitchens.
- Hire a licensed electrician for new wiring runs, but replacing an existing fixture with the same electrical box is a straightforward DIY task when you turn off power and verify the circuit is dead.
- Budget-friendly island lighting starts at $30–50 per pendant, with mid-range options at $80–150, though upgrades like dimmable fixtures and quality finishes pay dividends in ambiance and longevity.
Why Lighting Above Your Island Matters
Your kitchen island does a lot: food prep, seating, storage, and gathering space. Proper lighting makes all of it safer and more enjoyable. Without dedicated fixtures overhead, you’re either squinting at the cutting board or casting shadows with your body as you work. Island lights aren’t decorative extras, they’re essential task lighting.
Beyond function, island lighting creates visual balance in a large kitchen. A single ceiling fixture above the island draws the eye downward and anchors the space. Multiple pendants hung at staggered heights add dimension and modern appeal. Good lighting also flatters materials: granite, butcher block, and stainless steel all look richer when properly lit.
Building codes don’t require lights above islands (they fall under general ambient lighting), so you have flexibility. But many municipalities do require electrical outlets on or near the island itself per the National Electrical Code (NEC). Check your local code before you start, it affects outlet placement and may influence wiring runs for any new fixtures.
Choosing the Right Style for Your Kitchen
Your island lights should echo your kitchen’s design language without screaming for attention. A modern kitchen with white cabinetry and stainless steel calls for sleek pendants, think brushed metal, frosted glass, or geometric shapes. A farmhouse or transitional kitchen suits vintage-inspired Edison bulbs, warm brass fixtures, or cage-style pendants that soften the industrial edge.
Color temperature matters as much as shape. Warm white (2700K) feels cozy and works in nearly every kitchen. Cool white (4000K) is sharper and suits contemporary or task-focused areas. Resources like Remodelista showcase hundreds of kitchen remodel inspirations organized by style, helping you nail the aesthetic before you shop.
Cluttered kitchens benefit from minimal, understated fixtures. Open-plan kitchens that blend into living spaces might call for fixtures that transition visually, brass pendants over the island and matching sconces in the dining area create cohesion. The rule of thumb: your island lights should feel like they belong in the room, not like an afterthought.
Popular Fixture Types and Materials
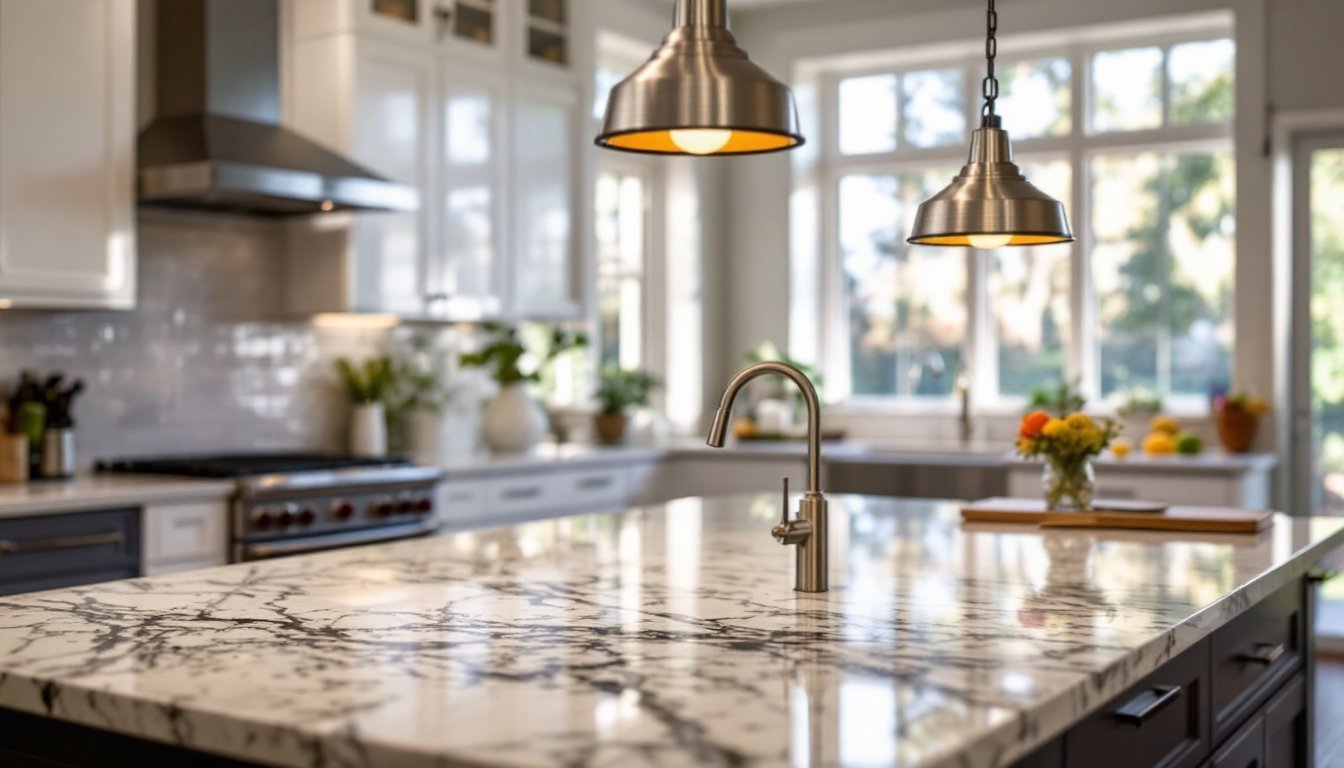
Pendant lights remain the most popular choice for islands. One large pendant or three smaller ones hung in a row work equally well, single fixtures suit compact islands, while multiples fill longer spans and add visual interest. Pendant shades come in glass (clear, frosted, colored), metal, fabric, or ceramic. Glass transmits light most efficiently: metal shades direct light downward, which is ideal for task work.
Chandeliers work on spacious islands and add glamour. Crystal, wrought iron, or drum-shade styles can anchor a larger room. Size them generously, an undersized chandelier looks awkward and won’t light the workspace adequately. Houzz helps homeowners and pros visualize chandelier scale before purchase.
Flush-mount or semi-flush fixtures suit low ceilings. If your island sits only 7 feet below the ceiling, a long pendant chain won’t fit without hitting heads. Flush-mounts install flush or nearly flush to the ceiling, trading elegance for clearance.
Track lighting offers flexibility, individual fixtures can be angled and repositioned without rewiring. It’s practical for kitchens that evolve, though it reads less finished than pendants.
Materials range widely. Stainless steel and brushed nickel resist fingerprints. Brass and bronze age beautifully and add warmth. Ceramic, concrete, and reclaimed wood bring texture. Choose materials that align with other hardware in your kitchen: faucet finish, cabinet pulls, and existing light fixtures should echo the same metals and tones.
Sizing and Height Recommendations
Island length determines fixture count. Islands under 4 feet work best with a single fixture. Islands 4–6 feet suit two pendants. Islands 6–8 feet or longer often benefit from three pendants spaced evenly. If using three, space them roughly 24–30 inches apart and center the group over the island.
Fixture width and diameter are critical. A pendant shouldn’t exceed one-third the island’s width. For a 3-foot-wide island, choose pendants or a chandelier no wider than 12 inches. Oversized fixtures overwhelm the space and obstruct sightlines across the kitchen.
Hanging height prevents head bumps and glare. Standard guidance: the bottom of the fixture should sit 30–36 inches above the island countertop. If your island has a bar or overhang, measure from the overhang surface. At 8-foot ceiling height, this spacing leaves 48–54 inches of clearance above the fixture, comfortable for most people standing beneath it. If your ceiling is lower, use smaller fixtures or semi-flush mounts to avoid feeling cramped.
Test height before committing. Many electricians are willing to temporarily rig a fixture at proposed height so you can live with it a few days. If you’re buying adjustable pendants with chains or cords, you can fine-tune once installed. Resources like The Kitchn offer small kitchen solutions and detailed diagrams for fixture placement.
Installation Tips and Best Practices
Electrical work requires honesty about your skill level. If you’re adding a fixture to existing wiring, tapping into a nearby outlet or ceiling light, hire a licensed electrician unless you’ve done this before. Running new cable through walls, adding junction boxes, or upgrading circuits isn’t DIY territory if you lack experience. Mistakes create fire hazards and code violations.
If you’re replacing an existing fixture directly (same box, same wiring), the job is straightforward. Turn off power at the breaker, verify the circuit is dead with a non-contact voltage tester, and remove the old fixture. Note wire colors, black is hot, white is neutral, bare copper or green is ground. Twist matching wires together, cover with wire nuts, and secure the new fixture bracket to the electrical box.
Pendant hanging height and spacing need precision. Mark the centerline of your island on the ceiling before drilling. Use a stud finder to avoid joists (they’ll block cable runs). If you can’t avoid a joist, route cable around it rather than through it, drilling through joists weakens them. Drill pilot holes slightly smaller than your mounting anchors to prevent cracking drywall.
Chain and cable management matters. Excess chain looks sloppy. Most pendant fixtures include adjustable chain lengths: remove links before hanging, or order fixtures with the correct length upfront. Coil spare chain before installation and stash it above the fixture box, it’s handy if you move or adjust height later.
Weight capacity is non-negotiable. Heavy chandeliers and multi-light fixtures require reinforced ceiling boxes rated for 50+ pounds. Standard old-work electrical boxes maxed out at 10–15 pounds. If you’re upgrading to heavy fixtures, swap the box, it’s cheap insurance against a fixture crashing onto the island.
Bulb selection completes the job. Use dimmable LED bulbs matching your target color temperature. LEDs save energy and run cool, so they’re safe if fixtures hang low. Confirm bulb type before purchase: some pendants need candelabra base (E12), others standard base (E26). Read the fixture specs carefully.
Budget-Friendly Options and Upgrades
Budget pendants start around $30–50 per fixture at big-box stores. Mid-range fixtures (stainless, quality glass, solid construction) run $80–150 each. High-end designer pieces exceed $200, but you’re often paying for brand reputation, not dramatically better light.
Save money by choosing fixtures you can install yourself, simple pendant swaps where you’re not running new wiring. Buy pendant kits with pre-cut chain lengths and integrated wiring: they skip the guesswork. Search for “ready-to-hang” or “DIY-friendly” fixtures to avoid surprises.
Upgrades worth the cost: dimmable fixtures (adds $20–40) for flexible ambiance, brass or brushed finishes ($15–30 premium) that age gracefully, and integrated LED bulbs ($10–20 per bulb initially but recoup through lower energy use). Cheap fixtures often use thin metal that dents or flimsy shades that rattle, avoid the absolute bottom tier.
Second-hand and salvaged fixtures from architectural salvage yards or online marketplaces can be gems. Inspect wiring closely: rewiring a vintage fixture by a pro costs $50–100 but is worth it for a statement piece. Shop sales around holidays, July 4th, Labor Day, and Black Friday see kitchen lighting discounts at major retailers.
Conclusion
Island lighting is approachable even for inexperienced DIYers, especially if you’re replacing a fixture rather than running new circuits. The key is taking time to measure twice, choose fixtures that match your kitchen’s style and scale, and hang them at the correct height. Whether you’re going minimal with a single pendant or dramatic with three sculptural pieces, the right fixture elevates your island from workstation to kitchen centerpiece. Get the electrical work right, trust your eye on spacing and height, and you’ll have beautiful, functional lighting that feels natural in your space.