
Roomba error codes can be frustrating, especially when your robot vacuum suddenly stops mid-clean and flashes a cryptic message on its dock. Error 15 on a Roomba is one of those codes that makes homeowners wonder if they’re looking at an expensive repair. The good news? Most of the time, it’s fixable without calling a technician. Error 15 typically signals a wheel or brush problem, something that’s usually just dirt and debris clogging the works. In this guide, we’ll walk you through exactly what error 15 means and show you the step-by-step fixes that get your Roomba running again, often in under 15 minutes.
Table of Contents
ToggleKey Takeaways
- Error 15 on a Roomba indicates a wheel or brush drive malfunction, typically caused by dirt, hair, or debris preventing smooth rotation—and it’s fixable in under 15 minutes without calling a technician.
- Clean the main brush, side brush, and wheels by removing wrapped hair and lint, and wipe optical sensors with a dry cotton swab to resolve most error 15 issues.
- Perform a soft reset by holding the CLEAN button for 10 seconds, then charge the Roomba for at least 1 hour to restore normal function.
- Weekly brush checks, monthly deep cleanings, and timely filter and brush replacements prevent error 15 from recurring and keep your robot vacuum running reliably for years.
- If error 15 persists after cleaning and resetting, the issue may require professional repair, but this is rare in households that maintain their Roombas regularly.
What Does Error 15 Mean on a Roomba?
Error 15 on your Roomba indicates a wheel or brush drive malfunction. Essentially, the vacuum detects that one of its wheels or main brush isn’t spinning freely or isn’t turning at all. This is different from a general “stuck” error, it’s the Roomba’s way of saying the motor or wheel sensor isn’t getting the response it expects.
Most commonly, error 15 shows up when:
• Dirt, hair, or lint wraps tightly around the main brush
• The side brush is jammed or bent
• Debris wedged between a wheel and its housing prevents smooth rotation
• The wheel itself is damaged or misaligned
According to troubleshooting guides on Roomba error codes and fixes, this error is one of the most common ones users encounter, especially in households with pets or long-haired residents. The silver lining: it’s almost always solvable with basic cleaning and inspection.
Check the Wheels and Brushes First
Before resetting anything, inspect the parts that are most likely to jam: the main brush and the wheels. This is where 80% of error 15 problems live.
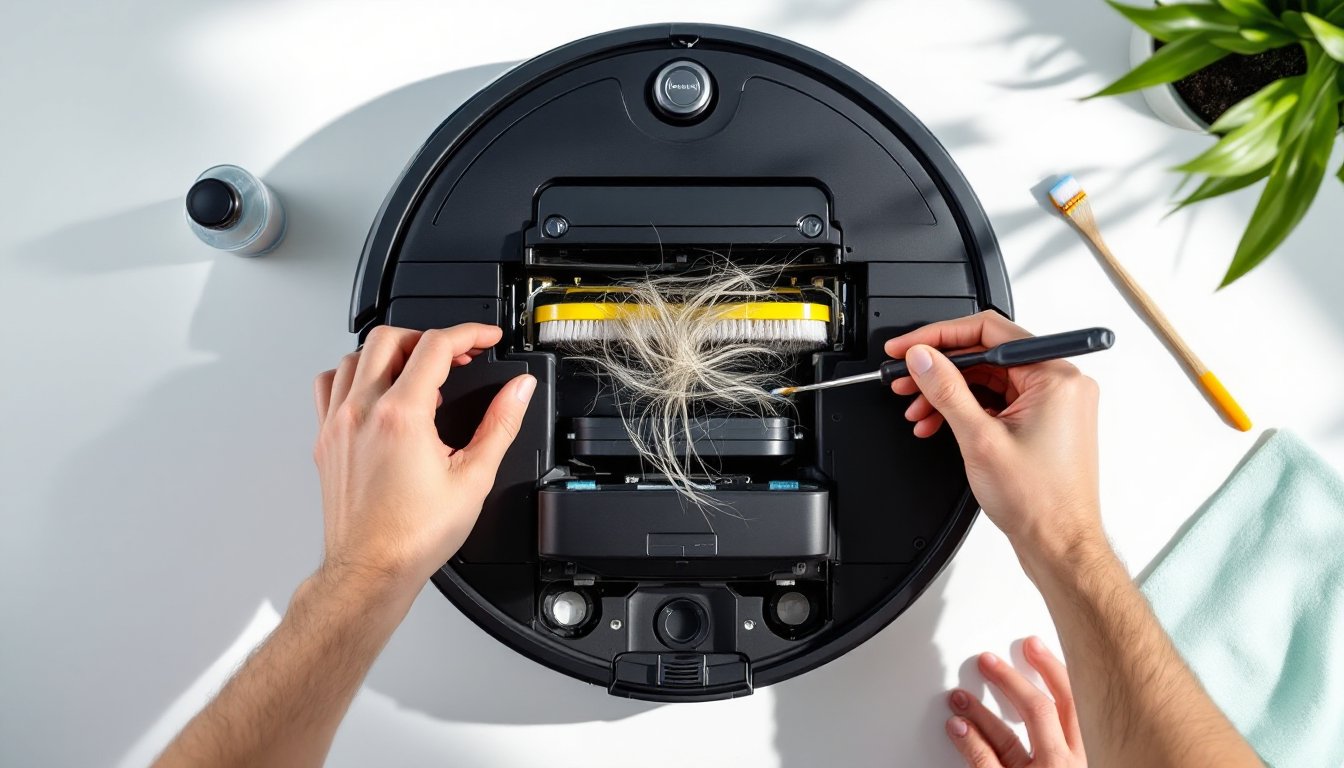
Removing Debris From the Main Brush
The main brush is a cylindrical roller that sits in the center-bottom of your Roomba’s undercarriage. Hair and dust accumulate here faster than anywhere else.
Here’s how to clean it:
- Power off your Roomba and flip it upside down on a clean surface (a paper towel or old newspaper works great).
- Locate the two yellow end caps on either side of the brush. Most models require you to press or twist these caps to release them, check your manual if you’re unsure which direction.
- Slide the brush straight out. You’ll likely see a substantial ball of hair and lint already, this is normal and expected.
- Use your fingers or an old toothbrush to pull off the wrapped hair. A small pair of scissors or a brush comb designed for removing lint works even better.
- Once the brush is visibly clean and spins freely by hand, snap the end caps back in place and test the rotation. It should spin without resistance.
- Flip your Roomba upright and power it back on.
If the brush looks damaged (cracks, missing bristles), it’s time to replace it. Roomba brushes are inexpensive ($15–$30) and swap out in seconds.
Inspecting the Side Brush and Wheels
The side brush is the smaller, bristled wheel on the right side of your Roomba that helps push dirt toward the main vacuum. It rotates separately from the main brush.
- While your Roomba is still upside down, look for the side brush, it’s usually held in by one or two screws on the housing.
- Manually spin the side brush with your finger. If it doesn’t spin smoothly or feels gritty, debris is likely caught underneath.
- Remove the screws (a small Phillips-head screwdriver usually works) and lift out the side brush holder.
- Clean around the axle and the bristles with an old toothbrush or dry cloth. Hair wraps around this spindle constantly.
- Check the wheels next, they’re on the left and right sides of the Roomba’s body. Spin them by hand. They should rotate freely.
- Look for strands of hair looped around the axles. Gently pull any debris away with tweezers or your fingernails.
- Reassemble the side brush, making sure it clicks or screws back in fully.
Many homeowners skip this step because the side brush looks “clean enough,” but hair accumulation here is invisible until you check close-up. Spend an extra minute here, it often solves error 15 completely.
Clean the Bumper and Sensors
Beyond the brush and wheels, your Roomba relies on sensors to detect obstacles and measure wheel movement. Dust on these sensors can sometimes cause error codes, including error 15.
The bumper sensor runs along the front of your Roomba. Grime buildup here can cause false readings about wheel resistance. Use a slightly damp microfiber cloth (not wet, moisture can damage electronics) to wipe the bumper strip gently. Don’t scrub hard: just remove surface dust.
Look also for the wheel encoders, tiny optical sensors near each wheel that monitor rotation. A single speck of lint across these sensors can register as a wheel malfunction. Use a dry cotton swab (not damp) to gently clean around the wheel housings and any visible sensor openings.
While you’re at it, check the undercarriage for a clogged dust bin filter. A full or blocked filter can cause the Roomba to strain, which sometimes triggers error codes. Empty the bin if needed and tap the filter gently against a trash can to dislodge dust. If the filter looks matted, replace it, a clogged filter defeats the whole point of the vacuum anyway.
These sensor and filter cleanings take about 5 minutes total and are part of regular Roomba maintenance. Do this monthly, even if you’re not seeing errors, and you’ll prevent most problems before they start.
Reset Your Roomba to Restore Function
After cleaning the brushes, wheels, and sensors, a soft reset often clears the error. This doesn’t erase settings or maps, it just tells the Roomba to re-check all its systems.
For most Roomba models:
- Press and hold the CLEAN button (the large circular button on top) for about 10 seconds until you hear a beep and the lights flash.
- Release the button and wait 30 seconds. The Roomba will restart.
- Place it back on the dock and let it charge for at least 1 hour. Error codes sometimes persist if the battery is low.
If your Roomba has a mobile app, you can also try resetting from there. Open the app, go to Settings or Device Info, and look for a Restart or Reset option. Follow the prompts.
According to professional guides on fixing Roomba errors, after you’ve done a physical cleaning and soft reset, the error usually disappears. If it persists after these steps, the issue may be a failed motor or sensor that requires professional repair or a replacement unit. But in the vast majority of cases, the combination of cleaning and resetting solves it.
Prevent Error 15 From Happening Again
Once you’ve fixed error 15, keeping it from returning is straightforward. Prevention is way easier than fixing.
• Weekly brush check: Flip your Roomba over once a week and do a quick visual inspection of the main brush and side brush. Pull off any obvious hair tangles. Takes 2 minutes and catches 90% of future issues.
• Empty the dust bin after every run: A full bin puts strain on the motor and wheels. Make it a habit to tap the bin into the trash immediately after each cleaning cycle.
• Monthly deep clean: Once a month, do a full cleaning routine, remove the main brush, wipe the wheels, clean sensors, and replace or wash the filter. This is the maintenance schedule most Roomba manuals recommend.
• Check for obstacles: Before each run, quickly scan your floors for small objects, power cords, or rugs with long fringe that could tangle. Roombas are smart, but they still get tangled.
• Replace brushes and filters on schedule: Main brushes typically last 6–12 months depending on use. Filters last 2–3 months before they clog. Mark these on your calendar and swap them when due, it’s cheap insurance.
On smart home device reviews, experts consistently note that regular maintenance transforms robot vacuums from frustrating to reliable. The Roombas that fail early are the ones that never get cleaned. The ones that run for years are maintained on schedule.
If you have pets, you’ll be cleaning more frequently. Pet hair is relentless. Adjust your maintenance schedule accordingly, weekly deep cleans instead of monthly if you have multiple dogs or cats.
Final Notes
Error 15 on your Roomba doesn’t mean your vacuum is broken. In most cases, it’s just asking for help, usually in the form of a thorough cleaning and a reset. Spend 15 minutes on the steps above, and you’ll likely have your Roomba working again without calling for service.
Make preventive maintenance part of your routine, and error 15 becomes something you read about in troubleshooting guides instead of something you live through. A few minutes a month keeps your robot vacuum running smoothly and your floors clean consistently.